ぽっちぽちにしてやんよ

技術ネタとかアプリに関する話とか

RubyMotion 1.12 出てますよ

昨日ぐらいにRubyMotion 1.12が出てます. 主にBugfixの模様.

更新内容(原文)

= RubyMotion 1.12 =

  * Fixed a bug where sending an `init' message alone (without using `alloc'
    before) would lead to a memory crash. This was possible when overloading
    an initWith* method and doing `self.init' inside.
  * Fixed a bug where performing Objective-C methods that accept CFType objects
    would crash the program (ex. [ABPersonViewController setDisplayedPerson:]).
  * Switched to clang++ to link the executable bits. This fixes linker crashes
    on iOS 6.0.
  * Added `fast' output for `rake spec'. Fixed a bug in the other outputs.
    Patch by Marin Usalj.
  * Improved the build system to let the user specify CPU archs that should be
    used for a certain platform. The `app.archs' method returns a Hash that one
    can tweak. This is so far only useful when you target 4.3 (which is armv6
    and armv7) and want to link with a 3rd-party library that only supports
    armv7 (ex. app.archs['iPhoneOS'] = ['armv7']).
  * Improved `rake simulator' to honor the `deployment_target' environment
    variable (ex. rake deployment_target=4.3). Patch by Satoshi Ebisawa.
  * Fixed a bug in the build system where the compiler would not use the right
    BridgeSupport files when using a lower deployment_target.
    Patch by Satoshi Ebisawa.
  * Fixed the build system to re-link the .app executable in case one of the
    vendored libraries changed.
  * Fixed bugs in both ARM/simulator compilers where structures smaller than
    64-bit would not be following the ABI and causing unexpected behavior in
    certain cases (ex. cocos2d). Thanks to Aaron Hurley for the detective work.
  * Removed Kernel#select as it clashes with a private `select' method defined
    by iOS and triggered when hittin the select button in a paste action.
    Thanks to Francis Chong for the detective work.

更新内容(訳)

  • alloc無しでinitを呼んだ時にメモリ破壊を引き起こすバグを修正.initWithなんとかをオーバーロードして,そのメソッド内でself.initを呼んでいた場合起こっていた模様.
  • CFTypeを受け取るObjCのメソッドを呼んだ時にクラッシュするバグを修正.ABPersonViewControllerのsetDisplayedPerson:とか.
  • clang++のexecutable bitを立てるようにした.これにより,iOS6.0でリンカがクラッシュを引き起こすのが修正される.
  • rake specの出力モードにfastが追加された.他の出力モードのバグも修正.
  • build systemが改善してapp.archsのハッシュをいじることでCPUアーキテクチャを指定できる様になった.(app.archs[‘iPhoneOS’]=[‘armv7’]とか)
  • rake simulatorするときにdeployment_target環境変数を評価するようになった.(rake deployment_target4.3 とかする)
  • deployment_targetを昔のにしてる時,BridgeSupportファイルが正しく使われなかった問題を修正
  • vendoreライブラリが1個でも変更されてたら再リンクするようにしたよ
  • ARM/simulator両方のコンパイラで64bitより小さい構造体がABIに反映されない問題を修正.これによってcocos2dなど期待しない動作をしていたのが修正された.
  • Kernel#selectを削除.pasteアクションの選択ボタンを押した時とかにクラッシュする問題が修正される.

その他

deployment_target周りで問題が見つかっているらしい.

deployment_targetに5.0を指定して5.0SDKが無い時(SDKが5.1など)にrakeに失敗するらしい.

修正は次のリリースに入る模様.

待てない人は, https://github.com/HipByte/RubyMotion/commit/01315ce30ce5e5e2f74618862a1172aca95b9cdf をrevertすればいいらしい.
RubyMotionを使ってる人はTestFlight使うの簡単だからやった方がいいよ

iOSアプリを開発していて,友達とかチームの人に配布する時のAdHoc配布はTestFlightが便利です.

XCodeでやってたときは,AdHoc用の構成を作ってEntitlementがどうとかしてオーガナイザでIPAファイルにしてTestFlightのサイトにアクセスしてUpload BuildでIPAをアップロードして配布するメンバーを選んで,,,というような事をしないといけませんでした.

※ 最近はTestFlight Desktop Appとか出てて何かもうちょっと楽になってそうな感じだけど.

RubyMotionではmotion-testflightというgemがありまして,そこらへんを楽チンに出来ます.

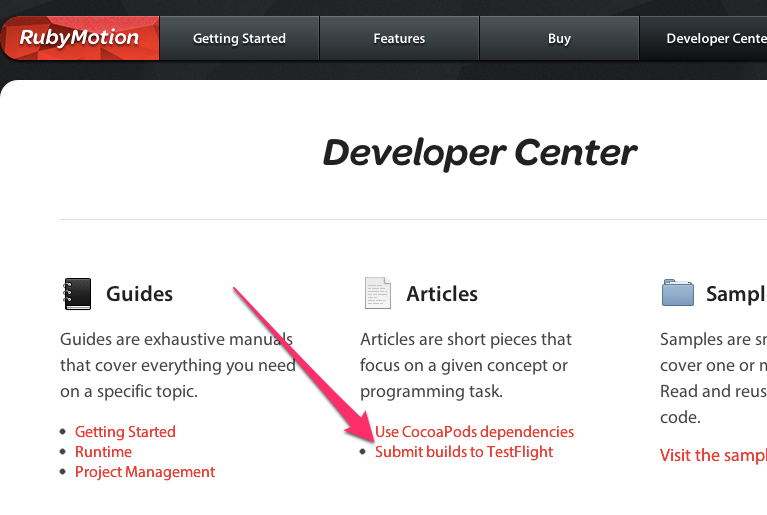
developer center

公式のDeveloper Centerにもガイドがあるので,みんなやってるかな?

まぁとりあえず導入とどう設定してるか解説してみるよ.

motion-testflightを使うには4つ準備が必要です.

  1. motion-testflightのインストール
  2. API TokenをRakefileに設定する
  3. Team TokenをRakefileに設定する
  4. TestFlight SDKをvendorに入れる

motion-testflightのインストール

$ sudo gem install motion-testflight

API TokenをRakefileに設定する

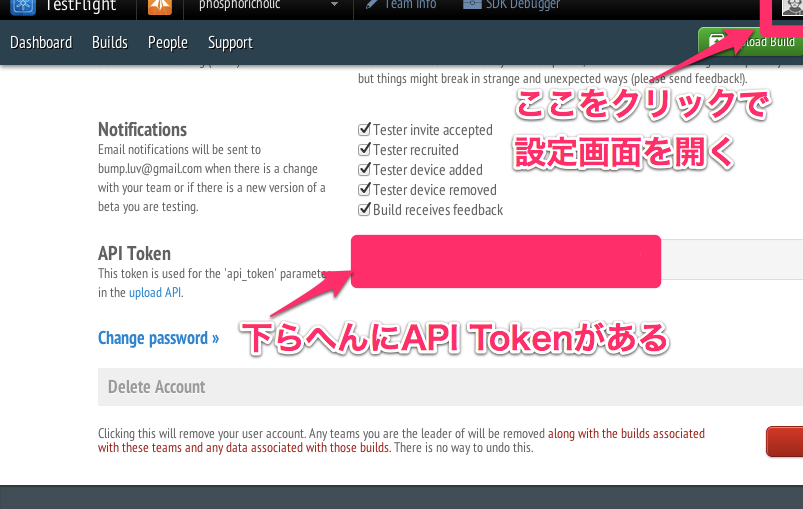
次に,TestFlightのWebページに行ってAPI Tokenを取得する必要があります.

api token

TestFlightのWebページに行ってログインします. その後,右上のをクリックしてアカウント設定を開きます. その中の下の方にAPI Tokenが書いてあるのでコピーします.

Rakefileapp.testflight.api_tokenに設定します.

Motion::Project::App.setup do |app|
    # Use `rake config' to see complete project settings.
    app.name = 'stickey'
    app.testflight.api_token = '<API Token>'
end

こんな感じになります.

Team TokenをRakefileに設定する

TestFlightにはチームとか言う配布する範囲的なものが決めれます.

※ チーム内でもdistribution_listという更に細かく配布先を設定することも出来ます.

そして,そのチームごとにTeam TokenというAPI Tokenとは別のものがあります.これも設定する必要があります.

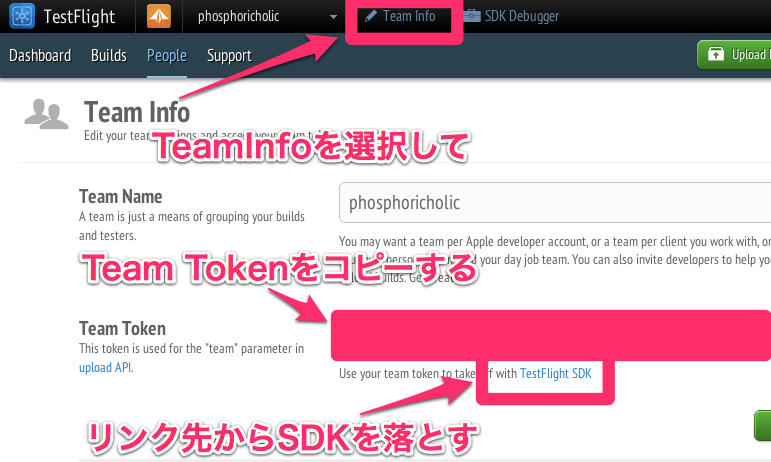
TeamToken

TeamInfoからTeamTokenをコピペしてRakefileapp.testflight.team_tokenに設定します.

Motion::Project::App.setup do |app|
    # Use `rake config' to see complete project settings.
    app.name = 'stickey'
    app.testflight.api_token = '<API Token>'
    app.testflight.team_token = '<Team Token>'
end

こんな感じになります.

TestFlight SDKをダウンロードする

motion-testflightはTestFlight SDKが無いと動きません.

そのため,さっきのTeamTokenをコピーした近くにTestFlight SDKへのリンクがあるのでそこから落としておきます.

TestFlight SDK ダウンロード

TestFlight SDKはzipなので,解凍してvendor/TestFlightとかに置いておきます.

Rakefile にも置き場所を設定する必要があります.

Motion::Project::App.setup do |app|
    # Use `rake config' to see complete project settings.
    app.name = 'stickey'
    app.testflight.api_token = '<API Token>'
    app.testflight.team_token = '<Team Token>'
    app.testflight.sdk = 'vendor/TestFlight'
end

TestFlightで配布する

$ rake testflight notes="リリースノートを入れる"

とすれば,buildしてTestFlightへアップロードされていきます.

distribution_listを作った方がいい

ここまでだと,AdHoc BuildされたパッケージがTestFlightに上がるのは楽になりましたが, まだTestFlightのWebサイトにアクセスしてどのTeammateを配布先にするかを選択しないといけません.

これは非常にめんどくさいので,distribution_listを作ります.

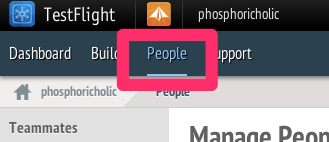
people

メニューのPeopleの所を選びます.

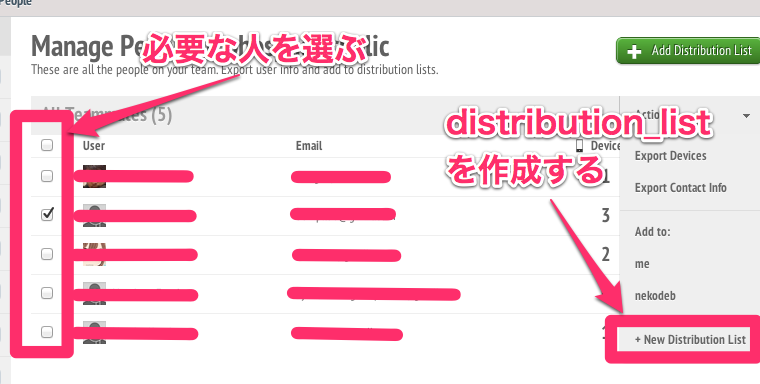
distribution

distribution_listに入れたい人を選択して,右のActionsから+New Distribution Listを選択します. あとは,そのdistribution_listに名前を付けてSaveすれば完了です.

※ distribution_listは何個も作れるっぽいので,「アプリ毎」とか「このアプリのテスターはこの人達」とか「どうせ全員に配るから全員」など色んな単位で作っておくと色々指定出来て楽ちんです.

distribution_listを作ったら,Rakefileにdistribution_listを設定します.

Motion::Project::App.setup do |app|
    # Use `rake config' to see complete project settings.
    app.name = 'stickey'
    app.testflight.api_token = '<API Token>'
    app.testflight.team_token = '<Team Token>'
    app.testflight.sdk = 'vendor/TestFlight'
    app.testflight.distribution_lists = ['<distribution_list>']
end

こんな感じで設定します.Arrayで設定できるので,この集団とあの集団に配布したいという時も2つ設定すればいいだけです.

証明書とProvisioningProfile

証明書(codesign_certificate)とProvisioningProfileは何も設定しないと, keychainの初めに見つかった証明書と~/Library/MobileDevice/Provisioning内にある初めの.mobileprovisionを使ったりします.

割りとTestFlight配布だと上手くいかなくなることが多いので,Rakefile で指定するといいです.

Motion::Project::App.setup do |app|
    # Use `rake config' to see complete project settings.
    app.name = 'stickey'
    app.testflight.api_token = '<API Token>'
    app.testflight.team_token = '<Team Token>'
    app.testflight.sdk = 'vendor/TestFlight'
    app.testflight.distribution_lists = ['<distribution_list>']

    app.codesign_certificate = "iPhone Distribution: なまえがはいったり"
    app.provisioning_profile = "/Users/<Username>/Library/MobileDevice/Provisioning Profiles/XXXXXXXXXXXXXXXX.mobileprovision"
end

こんな感じに指定すると良いです.

app.provisioning_profile~/...とか入れるとエラーになるので,普通にフルパス入れるとよいです.

まとめ

motion-testflight を入れるとAdHoc配布がすごく楽になります. 今まではXCodeのオーガナイザとブラウザとエディタを行ったり来たりでしたが, simulatorの起動等と同じようにターミナルで完結するのですごく楽.

他人へのAdHoc配布だけでなく,自分で複数のdeviceに入れるときもUSBを繋ぎ変えてrake deviceを連発するより楽だと思うので,積極的に使っていくと良いと思います.

RubyMotion 1.11が出て,iOS 6.0 Beta1 でも使える様になった!

RubyMotion が早くもiOS 6.0で使えるようになった模様.

$ sudo motion update

しましょう!

更に,blockにnilを渡しても大丈夫になったので,何もしなくていいのにlambda{}的なことを書かないといけなかったのが楽になります!

リリースノート

= RubyMotion 1.11 =

  * Fixed a bug where the runtime would not allow `nil' to be passed as a
    C-level block argument.
  * Fixed a bug where methods defined by attr_* would abort the program when
    called by Objective-C.
  * Improved `rake spec' to honor the `output' environment variable, which can
    be used to select a different output format. Available formats: spec_dox,
    test_unit, tap and knock (ex. rake spec output=test_unit).
  * Support for the iOS 6.0 Beta 1 SDK can be generated after having installed
    Xcode 4.5 by typing the following command:
    $ cd /Library/RubyMotion/data/6.0; rake update

リリースノート訳

  • blockにnilが渡せなかったのを修正
  • attr_なんとかで定義したメソッドをObjCから呼んだら(どうやるの?)落ちる問題を修正した
  • rake specの出力フォーマットを選べる様になったよ
  • iOS 6.0 Beta 1 サポート

iOS 6.0 beta 1 を使う方法

XCode4.5をダウンロードしてインストールします.

RubyMotion を 1.11 にアップデートしておきます.

その後,

$ cd /Library/RubyMotion/data/6.0
$ gem install nokogiri
$ rake update

を行なえば,RubyMotionで使えるようになります!

Rakefileに

app.xcode_dir = '/Applications/新XCodeの場所...'

とかすればいいらしいです. (普通に入れてる人は別にRakefileに書かなくてもいいかな)

[RubyMotion] Bundlerを使って楽をしてみた!

昨日Using Bundler With Rubymotionという記事が投稿されて,話題になっていたので早速ためしてみた.

記事の内容的には,色々requireしたりgem installしたりするのめんどくさいよね!それbundle使えばできるよ!てな感じでした.

やってみよう!

何はともあれ,bundlerを入れます.

$ gem install bundler

Rakefilerequire 'motion/project'の下辺りに

require 'bundler'
Bundler.require

を追加しておきます.

あとは,Gemfileを作成して

$ cat > Gemfile
source :rubygems

gem "rake"
gem "motion-testflight"

とかして保存しておきます.あとは,

$ bundle install

と実行すれば,自動的にgemを入れてくれます.

$ rake testflight

とか打てば,Rakefilerequire 'motion-testflight' とか書かなくてもOKです!

上記のはmotion-testflightでやっているのは訳があって, motion-testflightは実はgem installだけでは完結していなくて, TestFlight SDKをダウンロードしてvendor/testflightに入れないとダメなんですねー.残念です.

ここらへんどうすればいいんだろう,,,?僕はRuby畑の人ではないので,どうすればいいのかよく分からないです.Gemfileにダウンロードするスクリプトとか書けばいいの?(書けるの?)

One more thing

んで,そのbundleの記事に反応していた中で

という意見がありましたので,やってみました.

$ bundle install --path vendor/bundle

とやると,vendor/bundle以下にruby/<version>/gemsやらなんやら色んなファイルが出来てました.

これでシステムグローバルに入れるのではなくて,そのProject内にgemsをインストールしているわけですね.

その後は,いつもどおりrakeでいいのかな?と思ったのですが,

$ rake
Could not find rake-0.9.2.2 in any of the sources
Run `bundle install` to install missing gems.

とかいう警告が出てました. しかし,rake自体は成功している模様.よく分からない.

$ bundle exec rake

とやる必要があるのかな?と思ったのですが,同じメッセージが出てました. ここらへんはbundler詳しくないのでよく分からない,,,

何か分かったら教えて頂けるとありがたいです!

[RubyMotion] Simulatorでは動くのに実機で動かなくてハマった話

はじめに

アプリを作ってた時に,Simulatorでは動くのにrade devicerake testflightして実機で動かしたときに起動した瞬間落ちるという現象が起こって困った話です.

RubyMotionは実機でのデバッグに弱い!

実機を繋ぐのはめんどくさいので,基本はSimulatorで開発してるのですが,さぁ実機でうごかすかーとなったときに何故か即死して困りました.

RubyMotionはrakeしたときにSimulatorが自動的に立ち上がってインタラクティブシェルで色々出来るという利点があるのですが,これは実機では出来ません.(よね?)

なので,どうしてもSimulatorがメインになってしまう気がします.

今回実機で動かして落ちるとかいうことでハマったわけですが,結果的には実機で動かしてXCodeのOrganizerのConsoleからログを見て原因調査をしました. それ以外で実機オンリーのバグ調査はどうやるんでしょうか,,,XCodeだと実機で繋いでブレイクポイントとか貼れると思うのですが,RubyMotionだと方法がない,,,

今回のケース

さて,今回はどういう原因で落ちていたかです.

こういうSourceでした.

class AppDelegate
  def application(application, didFinishLaunchingWithOptions:launchOptions)
    @window = UIWindow.alloc.initWithFrame UIScreen.mainScreen.bounds
    @storyboard = UIStoryboard.storyboardWithName(
        "StoryBoard", 
        bundle: nil)
    @window.rootViewController = @storyboard.instantiateViewControllerWithIdentifier "NavigationController"

    @window.makeKeyAndVisible
    true
  end
end

リソースは Storyboard.storyboardです.

    @storyboard = UIStoryboard.storyboardWithName(
        "StoryBoard", 
        bundle: nil)

この部分で指定しているStoryboard名の大文字小文字が間違っているからですね.(正しくは"Storyboard") Simulatorでは何故か動くのですが,実機ではStoryboardが見つからないというログを吐いて落ちます.

まとめ

RubyMotionを使っていると,どうしてもSimulator頼りの開発になりがちですが,あまりに実機で確認しないと最終フェーズで痛いことになるっていう話でした!

TwitterをRubyMotion検索で張ってるのですが,Twitter上でもTypoで動かなくて困ったぜみたいな話とか見ましたし,実行時評価も色々と大変ですね. MethodとかPropertyなら静的解析とかでなんとかなりそうですが,今回みたいに文字列部分に関するところだとどうしても発見出来ない気がする,,,

RubyMotion のlib部分がソース公開してるのでPullRequestを送ってみたよ!

RubyMotionのlib部分のソースが公開されてます.

lib部分にはbuildsystemやRakefileとかvendor周りのあれこれが含まれていて, 最近のfixがその辺りの修正が多かったので,広くpull requestを受け付けようということですかね.

早速前の記事([RubyMotion] 証明書の名前に日本語が入っていた時にrake device出来ない問題の解決策)の解決策なんかは,motion createで生成されるRakefileの修正でいけるのでパパッとPull Requestを送って本家に組み込んでもらうのがいいです.

というわけで,Pull Requestを送っておきました. なんとpull/1で1番目のpullらしい.

本家に組み込まれるまで,ローカル環境を同じように修正するには, /Library/RubyMotion/lib/motion/project/app.rbを修正します.

修正内容はPull Requestの詳細をみて分かると思いますけど,102行目に

# -*- coding: utf-8 -*-

を追加するだけです.

[RubyMotion] 証明書の名前に日本語が入っていた時にrake Device出来ない問題の解決策

RubyMotionを色々いじって記事書いてたのですが,全然実機で試してませんでした.

BT周りの実装をしてて,ついにシミュレータで確認ができなくなったので,実機に転送しようとしてrake deviceしたら

"iPhone Developper: <your escaped name> : no identity found
rake aborted!
Command failed with status (1): [CODESIGN_ALLOCATE="/Developer/Platforms/iP...]

とか出やがりました.

マルチバイト文字を何かエスケープして\123\456みたいな形式にしてくれて,codesignに渡してしまうので,codesign側がそんなidentifyがねえよと言ってるわけですね.

RubyMotion Project Management Guide#2.Configuration によれば,

codesign_certificate
The name of the certificate to use for codesigning, as a String. The default value is the first iPhone Developer certificate found in keychain. Example: "iPhone Developer: Darth Vader (A3LKZY369Q)".

とあるので,Rakefileに指定すればいいかなーとか思って

$:.unshift("/Library/RubyMotion/lib")
require 'motion/project'

Motion::Project::App.setup do |app|
  # Use `rake config' to see complete project settings.
  app.name = 'hoge'
  app.codesign_certificate = "iPhone Developer: <your name>" # added
end

こんな感じで,app.codesign_certificateを追加したらですね,

rake aborted!
Rakefile:9: invalid multibyte char (US-ASCII)
Rakefile:9: syntax error, unexpected $end, expecting keyword_end

こういうエラーが出て,もしかしてRakefileにマルチバイト文字は指定出来ないのか,,,ピンチ!

$ file Rakefile
Rakefile: UTF-8 Unicode text

ちゃんとUTF8だよな,,,

解決策

と,まぁ色々悩んだんですが,結局解決策は

# -*- coding: utf-8 -*-
$:.unshift("/Library/RubyMotion/lib")
require 'motion/project'

Motion::Project::App.setup do |app|
  # Use `rake config' to see complete project settings.
  app.name = 'hoge'
  app.codesign_certificate = "iPhone Developer: <your name>"
end

これが正解です.

# -*- coding: utf-8 -*- を追加すればいいだけでした.

RubyMotion 1.9が出てた!早い!

一昨日ぐらいに1.8が出たと思ったら,もう1.9が出てきました.

しかも変更点が多い.

次は2.0なのか1.10なのか気になりますね!

= RubyMotion 1.9 =

  * Fixed a bug in the build system where the paths of vendored libraries
    would not be properly quoted and cause a build failure in case they
    contain space characters.
  * Fixed a bug in the build system where using a lower deployment_target
    version would cause a link error at runtime because the application was
    linking against a framework that does not exist (ex. CoreImage on 4.3).
  * Fixed the `rake spec' task to not move the simulator window to the
    foreground.
  * Fixed a bug in the compiler where APIs accepting pointers to
    CoreFoundation types could not be given Pointer objects of the :object
    type (ex. CFErrorRef*).
  * Added support for CoreAudio (experimental). At the very least, constants
    pointing to four-bytes characters should be properly covered.
  * Fixed a typo in "expected array of %d elements, got %d" exception message
    where the numbers were inverted. Thanks Enrico Thierbach.
  * Fixed a bug in the compiler where compiling strings containing only null
    characters (ex. "\x00") would cause a crash.
  • vendorライブラリのpathがQuoteで囲まれてなくてスペースが含まれてたときにビルドが失敗するのを修正
  • CoreImageを4.3で使おうとするみたいなdevelopment_targetを昔のに設定してるのに存在しないフレームワークを指定したときにリンクエラーになるビルドの問題を修正
  • rake specした時にシミュレータが前に出てこないのを修正
  • CFなんちゃらへのポインタをAPIに渡せない問題の修正
  • CoreAudioのサポートを追加.
  • 例外メッセージのtypo修正
  • nullキャラクターだけが含まれたstringをコンパイルする時にクラッシュしてた問題を修正

[RubyMotion]Bubble-Wrapを使ってみた

今日はBubble-Wrapというライブラリを使ってみました.

Bubble-Wrap

Bubble-Wrap はめんどくさいことを簡単にしてくれるヘルパーとかRubyっぽく書けない部分をよりRubyっぽくしてくれるライブラリです.

例えば,昨日書いたリソースの読み込みの所で,

path = NSBundle.mainBundle.resourcePath.stringByAppendingPathComponent "test.txt"

とか書きましたけど,NSBundle.mainBundle.resoucePathとかめんどくさいですよね.

それを,

path = resources_path.stringByAppendingPathComponent "text.txt"

にしてくれたりします. (他にも色々とdocuments_pathとかnotification_centerとか)

alert "Hoge"

とするだけで,

alert = UIAlertView.alloc.initWithTitle "Hoge",
    message: nil,
    delegate: nil,
    cancelButtonTitle: 'OK',
    otherButtonTitles: nil
alert.show

とやってくれたりするのもあります.

色々ありますが,Wikiを見ても一部しか載っていないので,何が出来るか全部把握するには,Githubでコードを見るしか無いっぽいです.

他にも便利なものがあって,HTTPアクセスやJSONのラッパーも提供されています. 例えば,Twitter APIにアクセスして,取得したJSONのデータのアクセスは

BubbleWrap::HTTP.get("https://api.twitter.com/1/users/show.json?screen_name=TwitterAPI&include_entities=true") do |response|
    json = BubbleWrap::JSON.parse response.body.to_str
    p json['name']
end

のように書けます. 元が NSURLConnectionを作って,delegateで受けてみたいなことを書かないのと比べるととても簡単です.

responsebodyだけでなく,headersstatus_codeとかok?(200 OKかどうかを調べる)などもあります.

他にも,device情報を取ったり,gestureを簡単に扱ったりするものもあるので,有効に活用して素早くRubyMotionでアプリ作って行きましょう!

RubyMotionでリソース読み込み

すごく初歩的なところだけども,RubyMotionで画像やテキストのリソースを.appの中にプリセット保持して使う方法です.

色々と試すときに画像やテキストを使いたい事が多くて,備忘録的に書いておきます.

まず,.app内にリソースを保持するには,/resourcesに入れておけばOKです.

あとは読み出しですが,画像の場合はすごく簡単で,

UIImage.imageNamed "hoge.png"

とかすれば,/resources/hoge.png が読み出されます.

テキストとかHTMLファイルとかは,

path = NSBundle.mainBundle.resourcePath.stringByAppendingPathComponent "test.txt"
str = NSString.stringWithContentsOfFile path

とかすればNSStringで取得できます.

NSBundle.mainBundle.resourcePath/resourcesに当たる場所のPathが取得できるので,あとは好きにすればOKということですね.

簡単なサンプルを書いといたので,置いときます.

画像とテキストを読みだしてUILabelとUIImageViewに貼り付けるサンプル